Star Trails: Capturing the Magic Movement of the Night Sky
In this article exploring the science of star trails, we’ll share tips to help you take your own stunning photos of the night sky in motion!
If you’ve ever browsed through photos of the night sky, the chances are you’ve come across at least a few splendid pictures of magnificent star trails in the night sky. But what exactly are these trails, and how can you replicate these photos yourself?
Welcome to the enchanting world of star trails! In this article, we’ll tell you everything you need to know about this magical phenomenon, part camera trick and part celestial wonder.
Whether you’re a seasoned pro or just starting out, this guide will help you capture the night sky’s beauty in all its glory!
What Are Star Trails?

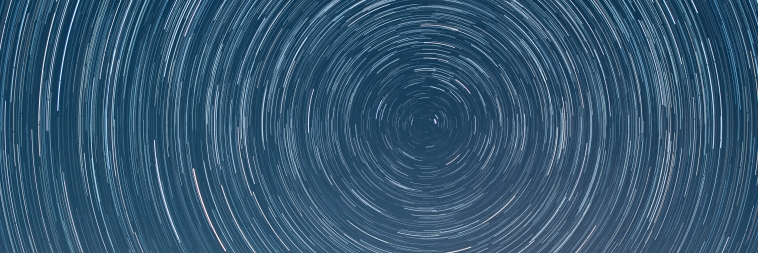
Star trails are stunning circular or arc-like patterns created by stars in long-exposure photographs. These trails represent the apparent motion of stars due to Earth’s rotation. With a few camera tweaks and a little planning, you can transform a sky full of twinkling stars into mesmerising light streams.
Capturing star trails requires patience, the right tools, and a bit of know-how. However, once mastered, this fascinating technique allows you to document the passage of time and the fascinating movement of our night sky.
The Science Behind Star Trails
Understanding the science behind star trails makes the process even more intriguing! The primary reason we see star trails is our own planet’s rotation. Earth spins on its axis, completing one rotation every 24 hours. This rotation causes stars to appear to move across the sky above us.
Stars near the celestial poles—the points directly above Earth’s North and South Poles—create circular trails. Meanwhile, stars closer to the celestial equator form arcs. This phenomenon occurs because the sky changes position relative to a fixed camera during long exposures.
Furthermore, the length and curvature of star trails depend on the exposure time and the star’s position in the sky. The longer the exposure, the more extended and dramatic the star trails.
Best Practices for Taking Stunning Star Trails Photos

Capturing stunning star trails is an art that combines technical skill and creative vision. Here are some best practices to help you get started:
- Choose the Right Location: Find a location with minimal light pollution. Dark sky parks, rural areas, or high-altitude locations are ideal. The darker the sky, the more vibrant your star trails will be!
- Time Your Shoot: Shoot during new moon phases or nights when the moon is absent in the sky. A bright moon can wash out the stars, diminishing the effect of your star trails.
- Frame Your Shot: To add depth and context to your star trail photos, try including interesting foreground elements like trees, mountains, or buildings. Experiment with different compositions to see what works best.
By following these practices, you’ll be well on your way to capturing breathtaking star trails that showcase the night sky’s splendour.
Essential Gear and Camera Settings

Having the right gear and settings is crucial for successful star trail photography. Here’s a rundown of everything you’ll need:
- Camera and Lens: A DSLR or mirrorless camera with manual settings is perfect. Pair it with a wide-angle lens (14-24mm) to capture more of the sky. A lens with a wide aperture (f/2.8 or lower) will also gather more light, making your trails brighter.
- Tripod and Intervalometer: A sturdy tripod is essential to keep your camera steady during long exposures. Additionally, an intervalometer (or a camera with built-in interval shooting) allows you to take multiple shots over a long period, which helps stack images later.
- Camera Settings: Set your camera to manual mode. Start with an ISO of 800-1600, an aperture of f/2.8, and a shutter speed between 20-30 seconds. Adjust these settings based on the light conditions and your desired effect.
With the right gear and settings, you’ll be well on your way towards capturing the magic of the night sky!
Plan Your Shoot for the Perfect Star Trails

Proper planning is absolutely vital to a successful star trails session. Clear skies are a must, so use weather apps or websites to monitor the forecast and choose a night with minimal cloud cover. What’s more, light pollution can also significantly impact your star trail photos. Use tools like Dark Site Finder to locate dark sky areas. The less artificial light, the better your results!
Visit your chosen location during the day to find the best spots and compositions. Note any potential obstacles and adjust your shoot accordingly. Carefully planning your shoot increases your chances of capturing stunning star trails and making the most of your time under the stars.
Post-Processing Techniques to Enhance Your Star Trails Images

Post-processing is where your star trail images really come to life. If you’ve taken multiple shorter exposures, use software like StarStaX or Photoshop to stack them together. This can reduce noise and enhances the trails’ visibility.
Use editing software to adjust your images’ exposure, contrast, and brightness. Enhancing these elements can make your star trails pop and add depth to your photos. Finally, clean up your images by removing any unwanted elements like aeroplane trails or light pollution. Use clone stamp or healing brush tools in your editing software for a polished final result.
OSR Star Finder App

Star trail photography is a rewarding and enchanting pursuit. Whether you’re a beginner or an experienced astrophotographer, there’s always something new to learn and explore.
For beginners, remember that patience and practice are essential. Start with short exposures and gradually increase them as you gain confidence. Experiment with different settings, compositions, and locations to find what works best for you.
For advanced photographers, push your boundaries by exploring new techniques and challenging yourself with more complex compositions. Consider joining astrophotography communities to share your work and learn from others.
Ready to elevate your star trails photography to new heights? Take your celestial journey a step further with our Star Finder App. This user-friendly app helps you quickly locate constellations and planets and enhances your overall stargazing experience.
Whether you’re planning your next shoot or simply indulging in the wonders of the night sky, the OSR Star Finder App is your perfect companion!