
The revolving star chart
With the OSR Gift Package you receive a unique revolving star chart. Everything you need to know about the OSR Star Map will be explained in this blog. Here you will find the answers to the questions you might have. Questions such as: what can I do with the star chart and how exactly does it work? Read all the information you need to use your OSR Star Map here!
What is a revolving star chart?
As the name implies, a star map is a map of the stars and constellations in the sky. However, there is something special about the OSR Star Map, because it rotates! This is also called a planisphere. There is a lot to experience on this revolving star chart. You can see the constellations, individual stars are shown by means of dots on the map, and it is also possible to find your own star by using your star coordinates.
What’s on a revolving star chart?
The revolving star chart has two sides, both covered by a transparent layer that can be rotated. Before using the star chart, you can choose the side that applies to you. You can choose from either the northern hemisphere or the southern hemisphere. The northern hemisphere side is used above the equator (Europe, Asia, North America and North Africa). The side for the southern hemisphere is used below the equator (Australia, South America, South Africa, and Antarctica).
⭐ Tip: When naming a star, make sure this star is visible from the hemisphere where you want to go stargazing!

Pick the side of the rotating star chart that your constellation is best visible on. When you’re ready, we can dive into the details a little more! There is a lot to discover on the revolving star chart, but you don’t always need everything. Here we briefly list all elements of the revolving star chart. Later we’ll explain how to view constellations and locate your own star.
Transparent disc:
- The transparent disc has a number of arcs with degrees, which indicate the visible area of the night sky.
- The hours and directions of the compass are indicated in black on the transparent disc. These will help you locate your star.
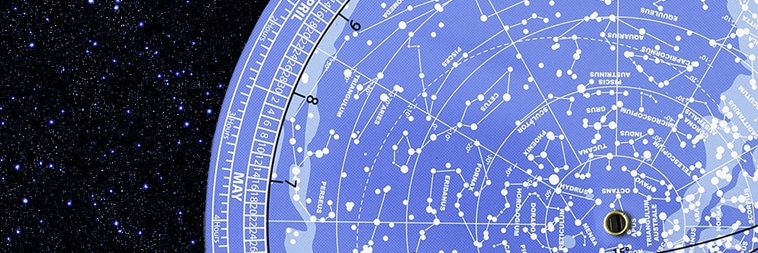
Blue disc:
- On the blue disc, the stars are visible in the form of white dots. The brighter the star, the thicker the dot.
- You can also find constellations on the blue disc, these are a collection of dots that are connected by lines.
- The blue disk has three circles on the outside. The outer circle focuses on the equatorial coordinates of your star. The equatorial coordinate system is used in astronomy to indicate the position of stars, among other things. So if you want to find a star based on coordinates, you can use this circle.
- The second circle is the month when you want to go out stargazing. By marking the month and the hour, you can see which stars and constellations are visible at that moment.
- The date of the Month is shown in the third and inner circle. Therefore, the transparent disc with the hour can be specifically turned to the day you are going out stargazing.
- A number of white lines can be seen on the blue disk. The vertical white lines with degrees are the declination lines, these lines are also part of the equatorial coordinates you need to find a specific star.
- The different blue colors in the background of the revolving star chart represent the visibility of the Milky Way. When it is really dark, for example on moonless nights, the Milky Way (shown in light blue) is very clearly visible!
How does it work?
As indicated, it is important to choose the right side of the revolving star chart first, the northern or southern hemisphere. You can then proceed in two ways.
Option 1: Find your own star
When you want to find the location of your own star in the night sky , use the outer circle with numbers representing right ascension (RA) expressed in hours. Then you use the declination (dec) of your star coordinates to find your own star.
An example star coordinate is: RA 21h35m29.89 +05°48’42.8” dec 10.10 mag.
Let’s decipher these coordinates!
- RA indicated the right ascension. RA is expressed in hours and minutes. To apply this to the revolving star chart, look at the outer circle of the blue disk. Here the hours are indicated with several bars between each hour, each bar representing 5 minutes.
- dec indicates the declination. dec is expressed in degrees. To apply this to the revolving star chart, use the white vertical lines on the blue disk. It lists degrees that help you find your own star.
- mag indicates the magnitude. It is important to know that the higher the mag number is, the less visible the star object will be for the human eye.
- The quotation marks within the star coordinate represent minutes of arc and seconds. You do not need this information to find your own star!
Option 2: Finding a specific constellation
A second way to use the revolving star chart is to search for constellations in the night sky. You can do this by performing the following steps:
- The transparent disc has numbers in black that represent hours. You can turn this disc to the hour you want to go out stargazing. Do this by turning it to the day of the Month mentioned on the blue disc. This can be found on the inner two circles.
- When you hold the revolving star chart above your head you can see which constellations are visible.
- You can navigate yourself when on the northern hemisphere by looking for the North Star.This is a very bright star which can be found in the constellation Ursa Minor. This star is located exactly above the northernmost point of the Earth.
- You can navigate yourself when on the southern hemisphere by looking for the constellation Crux. This is a constellation consisting of four stars in the southern sky. This constellation is visible in a bright portion of the Milky Way. You can also use a compass or the direction of the wind to orient yourself in relation to the starry sky.
- The arcs with degrees on the transparent disk indicate which parts of the starry sky you can observe. Based on the date and time of stargazing, these arcs show you how high you should look to find the constellation.
With star gazing, keep in mind that some constellations may only be visible at a different time. In addition, some constellations are also more visible in certain months than in other months.
⭐Tip: When looking for a constellation, try to find the brightest star of the constellation first. These are the thicker dots of the constellation! Having done this, it will be a little bit easier to find the less bright stars in the constellation.
Have fun stargazing!
There’s a lot to discover with the OSR Star Map: from locating your own star to finding the constellations in the sky. There are many more ways to find and view your star, using the latest technologies. In short, there are plenty of tools available to take your night of stargazing into the right direction!