Lesson in Archeoastronomy: Practical Tips for Beginners

Since the ancient civilizations believed the Earth is somewhat flat until (approximately) the new era, the equatorial coordinate system in the sky could not be known to them, but only this horizontal one, directly dependent on the place of observation.
For them, celestial bodies rose in the eastern half of the natural horizon and set in the western. These celestial bodies could be at a certain azimuth (angular deviation from the north) and at a certain angular height.
That knowledge is enough for someone to follow in the footsteps of their ancestors and start observing the sky and celestial bodies.
However, nothing prevents us from getting acquainted with some, slightly newer instruments, and achievements, which can make our job easier:
The compass and the inclinometer
For starters, you need a slightly more modern, but basic tool set: a compass and an inclinometer. The compass is a well-known device, and luckily for us, it also exists as a mobile phone application.
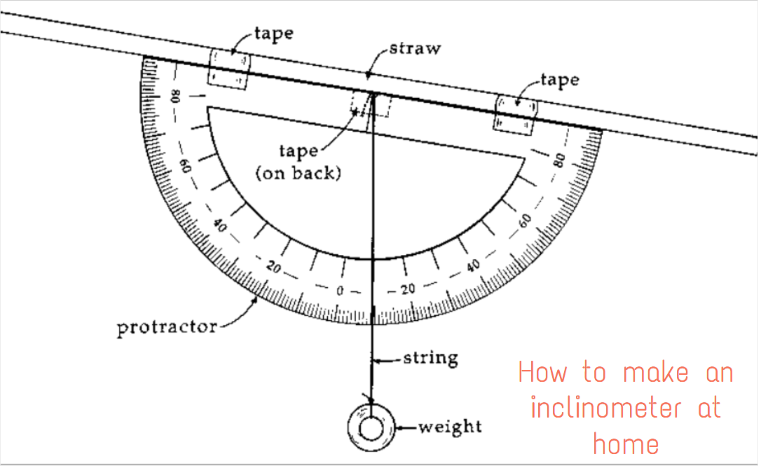
You can make the inclinometer yourself, from a protractor, a small weight (a small glass bead can be used), a thread and a piece of thicker cardboard. It is only important that the thread moves freely in relation to the center of the protractor.

With the help of these two instruments, you can measure the same two basic, horizontal “dimensions”, which define the position of one celestial body at a certain moment, observed from a certain place: horizontal angle to the north (azimuth) and vertical angle (altitude).
Checking the accuracy of your measurements
It is also good to know exactly where you are. For this purpose, you can also install a basic GPS device on your mobile phone, which will give you a fairly accurate geographical coordinates of the place where you are. With a good watch, you can also record the exact time when you performed the measurement.
There is also a mobile phone application called Dioptra. Simply place the mobile phone on a tripod and make sure the bottom edge is horizontal and the surface of the phone is vertical. On the screen you will get the exact coordinates of the observation point, azimuth, and angular height of the observed point in the sky or on the horizon. You can then check the data with a compass and inclinometer.
You can also check the accuracy of your measurements on an astronomical software like Red Shift 7 or Stellarium, which is a very good astronomical software, and it is free. Both apps will provide data on the azimuth and angular height (altitude) of the observed celestial body, which is enough for you to begin with.
Don’t be disappointed when you see that your first measurements are not accurate enough, and that the data given to you by the gnomon, that simplest device, is more accurate. This is because you have not yet mastered the corrections, which you must take into account when observing and measuring with a compass and inclinometer.
The corrections
The compass shows the magnetic north, which is not the same as geographic north; the needle indicates the Earth’s north Magnetic pole, not its north geographic pole.
The horizontal angular difference is called the magnetic declination, which changes over time, but you can find out its value at any time on the website “Magnetic declination calculator”, which you can look for online.
When you see that the magnetic declination is +4o 20′ E for example it means that the magnetic needle deviates so much from the geographical north to the east, so you should add the value you measured with a compass. This way you get the right azimuth, determined by the geographical north.
Atmospheric refraction or refraction of light is an optical phenomenon. It happens when a ray of light passes through layers of the atmosphere that are of different densities and makes objects in the sky seem to be at a greater angular height.
The greater the angular height of the celestial body, the lower the refraction and vice versa. And there is an online solution for that too. It is called “Atmospheric refraction online calculator” which is a computer software that will show you what the refraction of light is at the angular height you measured, and that is the value you need to subtract from the measured one.
Only when you make these two corrections, your measurement results will begin to agree nicely with the values given by astronomical software.
How to combine the obtained data
If you have measured the azimuth of the Sun with a compass, you should correct it for the value of the magnetic declination and write down the obtained value (A = azimuth) as well as the exact time of measurement and geographical coordinates of your standing point.
Correct the measured angular height of the Sun for the value of atmospheric refraction at that height and write it down.
Give the astronomical software a task by adjusting the geographical coordinates of your standing point and observation time, and you will see if you have accurately measured the azimuth and angular height (altitude) of the Sun.
If so, good job!
And if not, use the first free moment you have and simply repeat the measurements. In the evening, you can also exercise with the stars.
And don’t forget – the starry sky is both a calendar and a clock.
How about a tribute to the ones you love? Did you know that here at OSR you can name stars?

